Nodejs 디자인 패턴(4)-Proxy Pattern
업데이트:
Proxy
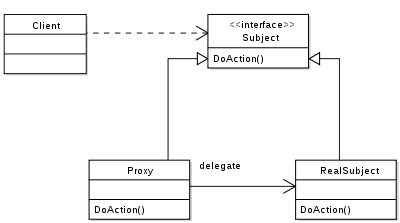
프록시란 다른 객체에 대한 접근을 제어하는 객체이다. 여기서 다른 객체를 Subject라고 한다. 프록시와 subject는 동일한 인터페이스를 가지고 있어서 이를 통해 다른 인터페이스와 완전 호환되도록 바꿀 수 있다. 프록시는 subject 에서 실행될 작업의 전부 또는 일부를 가로채서 해당 동작을 향상시키거나 보완한다.

프록시를 적용하는 상황
- 데이터 유효성 검사 : 프록시가 입력을 subject로 전달하기 전에 유효성 검사
- 보안 : 프록시는 클라이언트의 권한을 확인하고 확인된 경우만 요청을 subject로 전달
- 캐싱 : 프록시가 내부 캐시를 유지하여 데이터가 캐시에 존재하지 않는 경우에만 subject에서 작업을 실행
- 지연 초기화 : subject의 생성 비용이 비싸다면 프록시는 subject를 필요로 할 떄까지 연기한다.
- 로깅 : 프록시는 메소드 호출과 상대 매개변수를 인터셉트하고 기록한다.
- 원격 객체 : 프록시는 원격에 있는 객체를 가져와서 로컬에 있는 것처럼 보이게 한다.
구현
Object composition
기능 확장 또는 사용을 위해서 객체가 다른 객체와 결합하는 방법. delegate할 메서드를 모두 수동으로 설정해줘야 하는 단점이 있다.
function createProxy(subject){
    const proto = Object.getPrototypeOf(subject);

    function Proxy(subject){
        this.subject = subject;
    }

    Proxy.prototype = Object.create(proto)
    // Proxied Method
    Proxy.prototype.hello = function(){
        return this.subject.hello() + ' world!';
    };

    // delegated method
    Proxy.prototype.goodbye = function(){
        return this.subject.goodbye.apply(this.subject, arguments);
    };

    return new Proxy(subject);
}
module.exports = createProxy;
프로토타입 체인을 유지하지 않고(상속을 사용하지 않고) 간단히 구현하는 방법
function createProxy(subject){
    return {
        // proxied method
        hello: () => (subject.hello() + ' World!'),

        // delegated method
        goodbye: () => (subject.goodbye.apply(subject, arguments))
    };
}
Object Augmentation
== 몽키 패치. 메소드를 프록시된 구현체로 대체하여 직접 subject를 수정한다.
일부 메서드만 프록시할 필요가 있을 때 편리하지만, subject객체를 직접 수정하는 단점이 있다. 따라서 지연 초기화와 같이 subject의 초기화를 제어하려는 경우 사용할 수 없다.
A monkey patch is a way for a program to extend or modify supporting system software locally (affecting only the running instance of the program).
프로그램 런타임에 소스 코드를 수정하는 것.
function createProxy(subject){
    const helloOrig = subject.hello;
    subject.hello = () => (helloOrig.call(this) + ' World!');

    return subject;
}
Example : Logging
Writable Stream에 대한 프록시를 구현해본다. write()메서드에 대한 모든 호출을 가로채고 메세지를 기록한다. object composition을 사용한다.
function createLoggingWritable(writableOrig){
    const proto = Object.getPrototypeOf(writableOrig);

    function LoggingWritable(writableOrig){
        this.writableOrig = writableOrig;
    }

    LoggingWritable.prototype = Object.create(proto);

    LoggingWritable.prototype.write = function(chunk, encoding, callback){
        if(!callback && typeof encoding === 'function'){
            callback = encoding;
            encoding = undefined;
        }
        console.log('Writing ', chunk);
        return this.writableOrig.write(chunk, encoding, function(){
            console.log('Finished Writing', chunk);
            callback && callback();
        });
    };

    LoggingWritable.prototype.on = function(){
        return this.writableOrig.on.apply(this.writableOrig, arguments);
    };

    LoggingWritable.prototype.end = function(){
        return this.writableOrig.end.apply(this.writableOrig, arguments);
    };

    return new LoggingWritable(writableOrig);
};
Proxy Ecosystem
프록시 패턴은 function hooking, AOP(Aspect Oriented Programming)라고도 한다. 종종 미들웨어라고도 한다.
Proxy ES6
ES6에 Proxy라는 전역 객체가 도입되었다. 생성자는 다음과 같다.
const proxy = new Proxy(target, handler)
target은 subject를 가리키며 hander는 프록시의 동작을 정의하는 특수한 객체이다.
const scientist ={
    name : 'nikola',
    surname : 'tesla'
};

const uppercaseScientist = new Proxy(scientist, {
    get: (target, property) => target[property].toUpperCase()
});

console.log(uppercaseScientist.name, uppercaseScientist.surname);
// NIKOLA TESLA
Proxy 객체를 이용하면 메타 프로그래밍, 연산자 오버로딩, 객체 가상화와 같은 시나리오들을 가능하게 해준다.
다음은 모든 짝수를 포함하는 가상의 배열을 만든다.
const evenNumbers = new Proxy([], {
    get: (target, index) => index * 2,
    has: (target, number) => number % 2 === 0
});

console.log(evenNumbers[7]) // 14
console.log(2 in evenNumbers) // True
console.log(5 in evenNumbers) // False
댓글남기기